")
MCCMCC Microbiology Lab Report
Description
Lab 4
Specimen Preparation and Staining
Introduction: Connecting Your Learning
This laboratory exercise will introduce several types of staining techniques for viewing bacteria under a microscope.
| Multimedia Resources |
None |
| Required Assignments |
Lab 4 Assignment |
Focusing Your Learning
Course Competency
- Identify microorganisms in the laboratory, emphasizing bacteria.
As you work through this lab, consider the objectives below.
Lab Objectives
By the end of this lab, you should be able to:
- Describe procedures for preparing specimens for observation under the microscope.
- Identify bacteria using various staining techniques.
- Describe the differences in types of stains and uses for each stain.
Background Information
Bacteria are not readily examined microscopically in a living, unstained state. But examination of living microorganisms can be useful to observe cell activities, such as motility. It is also useful to observe the natural sizes and shapes of the cells because heat fixation and chemicals during the staining process cause some degree of cellular distortion.
The primary means of viewing bacteria in a living state is the hanging drop procedure. Living organisms can be viewed using the hanging drop procedure. This procedure is used to view cell shape and size as well as motility. True motility is self-directed by the organism, while Brownian movement is a vibratory movement of the cells due to their bombardment by water molecules in the suspension.
To make a hanging drop slide:
- Using a depression slide, spread a ring of petroleum jelly around the concavity of the slide.
- Place a loopful of bacterial culture in the center of the coverslip.
- Lower the depression slide with the concavity facing down onto the inoculated coverslip. Press gently to seal.
- Turn the hanging-drop slide over so that the coverslip is on-top and the culture drop adheres to the coverslip.

Preparation of a hanging drop slide:
 Creative Commons https://upload.wikimedia.org/wikipedia/commons/d/d… by Macedo, CC BY-SA 4.0
Visualization of living microorganisms is difficult, not only because they are small but also because they are transparent and practically colorless. To study their properties and to divide microorganisms into specific groups for diagnostic purposes, biological stains in conjunction with microscopy have become major tools in the microbiology lab.
Bacterial smears must be prepared prior to performing any staining technique. Smears are made from broth cultures or from cultures of a solid medium. The technique varies for broth and solid media.
With broth cultures, one or two loopfuls of the broth should be applied to the center of the slide using a sterile inoculating loop and spread evenly over a dime-size area of the slide. Allow the slides to air dry.
With cultures from solid media, the cultures must first be diluted. This is done by placing one or two loopfuls of water on the center of the slide where the cells will be diluted. Transfer of the cells requires the use of a sterile inoculating loop or needle. Only the tip of the loop or needle should touch the culture to prevent too many cells from being transferred. Suspension is accomplished by spreading the cells in a circular motion in the drop of water on the slide with the loop or needle. Then the sample should be heat fixed.

The preparation of a bacterial smear varies by if the specimen is from a broth culture or a solid culture.
by Microbiology A Laboratory Manual. 6th Edition.
Heat fixation is performed to prevent the bacterial smear from washing away during the staining procedure. Heat fixation can be performed by the rapid passage of the air-dried smear over the flame of a Bunsen burner.
Once the bacteria have been fixed onto a slide, the slide needs to be stained for easier viewing. Several types of stains are used in the microbiology laboratory.

a) A specimen can be heat-fixed by using a slide warmer like this one. b) Another method for heat-fixing a specimen is to hold a slide with a smear over a microincinerator.
Creative Commons https://openstax.org/books/microbiology/pages/2-4-… is licensed under CC BY 4.0.
THE CHEMISTRY OF STAINING:
Most stains used in microbiology are synthetic aniline dyes (compounds derived from benzene, a coal tar derivative). These dyes are usually salts, although a few are acids or bases composed of two charged ions (the positively charged ion is the cation, and the negatively charged ion is the anion). Either one of the ions can be the chromophore, which is the part of the molecule that is brightly colored. For example:
format('truetype')%3Bfont-weight%3Anormal%3Bfont-style%3Anormal%3B%7D%3C%2Fstyle%3E%3C%2Fdefs%3E%3Ctext%20font-family%3D%22Arial%22%20font-size%3D%2216%22%20font-style%3D%22italic%22%20text-anchor%3D%22middle%22%20x%3D%226.5%22%20y%3D%2216%22%3EM%3C%2Ftext%3E%3Ctext%20font-family%3D%22Arial%22%20font-size%3D%2216%22%20font-style%3D%22italic%22%20text-anchor%3D%22middle%22%20x%3D%2217.5%22%20y%3D%2216%22%3Ee%3C%2Ftext%3E%3Ctext%20font-family%3D%22Arial%22%20font-size%3D%2216%22%20font-style%3D%22italic%22%20text-anchor%3D%22middle%22%20x%3D%2224.5%22%20y%3D%2216%22%3Et%3C%2Ftext%3E%3Ctext%20font-family%3D%22Arial%22%20font-size%3D%2216%22%20font-style%3D%22italic%22%20text-anchor%3D%22middle%22%20x%3D%2230.5%22%20y%3D%2216%22%3Eh%3C%2Ftext%3E%3Ctext%20font-family%3D%22Arial%22%20font-size%3D%2216%22%20font-style%3D%22italic%22%20text-anchor%3D%22middle%22%20x%3D%2239.5%22%20y%3D%2216%22%3Ey%3C%2Ftext%3E%3Ctext%20font-family%3D%22Arial%22%20font-size%3D%2216%22%20font-style%3D%22italic%22%20text-anchor%3D%22middle%22%20x%3D%2245.5%22%20y%3D%2216%22%3El%3C%2Ftext%3E%3Ctext%20font-family%3D%22Arial%22%20font-size%3D%2216%22%20font-style%3D%22italic%22%20text-anchor%3D%22middle%22%20x%3D%2251.5%22%20y%3D%2216%22%3Ee%3C%2Ftext%3E%3Ctext%20font-family%3D%22Arial%22%20font-size%3D%2216%22%20font-style%3D%22italic%22%20text-anchor%3D%22middle%22%20x%3D%2260.5%22%20y%3D%2216%22%3En%3C%2Ftext%3E%3Ctext%20font-family%3D%22Arial%22%20font-size%3D%2216%22%20font-style%3D%22italic%22%20text-anchor%3D%22middle%22%20x%3D%2269.5%22%20y%3D%2216%22%3Ee%3C%2Ftext%3E%3Ctext%20font-family%3D%22Arial%22%20font-size%3D%2216%22%20font-style%3D%22italic%22%20text-anchor%3D%22middle%22%20x%3D%2284.5%22%20y%3D%2216%22%3EB%3C%2Ftext%3E%3Ctext%20font-family%3D%22Arial%22%20font-size%3D%2216%22%20font-style%3D%22italic%22%20text-anchor%3D%22middle%22%20x%3D%2292.5%22%20y%3D%2216%22%3El%3C%2Ftext%3E%3Ctext%20font-family%3D%22Arial%22%20font-size%3D%2216%22%20font-style%3D%22italic%22%20text-anchor%3D%22middle%22%20x%3D%2298.5%22%20y%3D%2216%22%3Eu%3C%2Ftext%3E%3Ctext%20font-family%3D%22Arial%22%20font-size%3D%2216%22%20font-style%3D%22italic%22%20text-anchor%3D%22middle%22%20x%3D%22107.5%22%20y%3D%2216%22%3Ee%3C%2Ftext%3E%3Ctext%20font-family%3D%22Arial%22%20font-size%3D%2216%22%20font-style%3D%22italic%22%20text-anchor%3D%22middle%22%20x%3D%22123.5%22%20y%3D%2216%22%3EC%3C%2Ftext%3E%3Ctext%20font-family%3D%22Arial%22%20font-size%3D%2216%22%20font-style%3D%22italic%22%20text-anchor%3D%22middle%22%20x%3D%22133.5%22%20y%3D%2216%22%3Eh%3C%2Ftext%3E%3Ctext%20font-family%3D%22Arial%22%20font-size%3D%2216%22%20font-style%3D%22italic%22%20text-anchor%3D%22middle%22%20x%3D%22140.5%22%20y%3D%2216%22%3El%3C%2Ftext%3E%3Ctext%20font-family%3D%22Arial%22%20font-size%3D%2216%22%20font-style%3D%22italic%22%20text-anchor%3D%22middle%22%20x%3D%22146.5%22%20y%3D%2216%22%3Eo%3C%2Ftext%3E%3Ctext%20font-family%3D%22Arial%22%20font-size%3D%2216%22%20font-style%3D%22italic%22%20text-anchor%3D%22middle%22%20x%3D%22153.5%22%20y%3D%2216%22%3Er%3C%2Ftext%3E%3Ctext%20font-family%3D%22Arial%22%20font-size%3D%2216%22%20font-style%3D%22italic%22%20text-anchor%3D%22middle%22%20x%3D%22158.5%22%20y%3D%2216%22%3Ei%3C%2Ftext%3E%3Ctext%20font-family%3D%22Arial%22%20font-size%3D%2216%22%20font-style%3D%22italic%22%20text-anchor%3D%22middle%22%20x%3D%22164.5%22%20y%3D%2216%22%3Ed%3C%2Ftext%3E%3Ctext%20font-family%3D%22Arial%22%20font-size%3D%2216%22%20font-style%3D%22italic%22%20text-anchor%3D%22middle%22%20x%3D%22173.5%22%20y%3D%2216%22%3Ee%3C%2Ftext%3E%3Ctext%20font-family%3D%22math12bba9f4124283edd644799e0ce%22%20font-size%3D%2216%22%20text-anchor%3D%22middle%22%20x%3D%22193.5%22%20y%3D%2216%22%3E%26%23x2192%3B%3C%2Ftext%3E%3Ctext%20font-family%3D%22Arial%22%20font-size%3D%2216%22%20font-style%3D%22italic%22%20text-anchor%3D%22middle%22%20x%3D%22213.5%22%20y%3D%2216%22%3EM%3C%2Ftext%3E%3Ctext%20font-family%3D%22Arial%22%20font-size%3D%2216%22%20font-style%3D%22italic%22%20text-anchor%3D%22middle%22%20x%3D%22224.5%22%20y%3D%2216%22%3Ee%3C%2Ftext%3E%3Ctext%20font-family%3D%22Arial%22%20font-size%3D%2216%22%20font-style%3D%22italic%22%20text-anchor%3D%22middle%22%20x%3D%22231.5%22%20y%3D%2216%22%3Et%3C%2Ftext%3E%3Ctext%20font-family%3D%22Arial%22%20font-size%3D%2216%22%20font-style%3D%22italic%22%20text-anchor%3D%22middle%22%20x%3D%22237.5%22%20y%3D%2216%22%3Eh%3C%2Ftext%3E%3Ctext%20font-family%3D%22Arial%22%20font-size%3D%2216%22%20font-style%3D%22italic%22%20text-anchor%3D%22middle%22%20x%3D%22246.5%22%20y%3D%2216%22%3Ey%3C%2Ftext%3E%3Ctext%20font-family%3D%22Arial%22%20font-size%3D%2216%22%20font-style%3D%22italic%22%20text-anchor%3D%22middle%22%20x%3D%22252.5%22%20y%3D%2216%22%3El%3C%2Ftext%3E%3Ctext%20font-family%3D%22Arial%22%20font-size%3D%2216%22%20font-style%3D%22italic%22%20text-anchor%3D%22middle%22%20x%3D%22258.5%22%20y%3D%2216%22%3Ee%3C%2Ftext%3E%3Ctext%20font-family%3D%22Arial%22%20font-size%3D%2216%22%20font-style%3D%22italic%22%20text-anchor%3D%22middle%22%20x%3D%22267.5%22%20y%3D%2216%22%3En%3C%2Ftext%3E%3C%2Fsvg%3E)
If the chromophore is a positive ion like methylene blue, the stain is considered a basic stain. Note that most cells typically have negatively charged cell walls, so the positive chromophores in basic dyes tend to stick to most cell walls (given their negative charges). As such a basic stain is the most frequently employed type of microbiological stain. But if the chromophore is a negative ion, then it is an acidic stain.
Most bacteria are stained when a basic stain permeates the cell wall and adheres by weak ionic bonds to the negative charges of the bacterial cell. A few of the basic dyes one encounters in this course are methylene blue, crystal violet, basic fuchsin, and safranin.
Acidic dyes, such as nigrosin, are generally repelled by bacteria because of the negative charges on their chromophores. As such, acidic stains are used to color the background while leaving the cells colorless.
SIMPLE STAINING PROCESSES:
In simple staining, the bacterial smear is stained with just one single dye. The purpose of simple staining is to simply allow the morphology and arrangement of bacterial cells to be seen more clearly. Simple stains use a single stain to color bacterial cells so that their size, shape, and arrangement can be observed. The most commonly used stains are methylene blue, crystal violet, and carbol fuchsin. The stain is applied to a fixed smear and then rinsed off with water. Simple stains are used when the organism is in a pure culture, which means that the culture contains only one organism. A simple stain that stains the bacterial cells themselves is a direct stain, and a simple stain that stains the background but leaves the bacteria unstained is a negative stain.
Negative stains use a single stain to color the background around cells. The stains will not penetrate the cells. Therefore, the unstained cells are easily seen against the colored background. Heat fixation is not required for negative stains as heat and chemicals will not distort cell shape and size. It also allows the microscopic observation of cells that do not easily stain, such as spirilla and spirochetes.

Simple Stains Chart
Creative Commons https://openstax.org/books/microbiology/pages/2-4-… is licensed under CC BY 4.0.
DIFFERENTIAL STAINING PROCESSES:
Differential staining requires the use of at least three chemical reagents that are applied sequentially to a heat-fixed smear.
- The first reagent is the primary stain; its function is to impart its color to all cells.
- To establish a color contrast, the second reagent used is the decolorizing reagent. The decolorization reagent may or may not remove the primary stain from the entire cell based on the chemical composition of cellular components.
- The final reagent, the counterstain, has a contrasting color to that of the primary stain. Following decolorization, if the primary stain is not washed out, the counterstain cannot be absorbed, and the cell or its components will retain the color of the primary stain. If the primary stain is removed, the decolorized cellular components will accept and assume the contrasting color of the counterstain.
In this way, cell types or their structures can be distinguished from each other on the basis of the stain that is retained. Differential staining can be used when the culture is not a pure culture. If two or more organisms are present in the culture, differential staining aids in the differentiation and identification of the multiple organisms.
Gram Stain
The most important differential stain used in microbiology is the Gram stain. It divides bacterial cells into two major groups, Gram-positive and Gram-negative, which makes it an essential tool for classification and differentiation of microorganisms. The Gram stain reaction is based on the difference in the chemical composition of bacterial cell walls and the ability of the bacterial cell wall to retain crystal violet during staining. Most bacteria possess a cell wall that contains either a thick peptidoglycan layer or a thin peptidoglycan layer with an additional lipopolysaccharide layer. Gram-positive cells have a thick peptidoglycan layer, and Gram-negative cells have a much thinner peptidoglycan layer while also being surrounded by outer lipid-containing layers.
The reagents used for the Gram stain are crystal violet, Gram’s iodine, ethyl alcohol, and safranin. Crystal violet is the primary stain. It stains cells purple. Gram’s iodine is the mordant. A mordant increases the cells affinity for the primary stain and forms a crystal violet-iodine complex that prevents the dye from being removed; the crystal violet is trapped inside the cell wall of gram-positive bacteria. But in gram-negative bacteria, the decolorizing agent removes the crystal violet-iodine complex. Ninety-five percent ethyl alcohol is the decolorizing agent. Safranin is the counterstain, which stains cells pink-red.

The 4-Step Gram Stain Process
Creative Commons https://openstax.org/books/microbiology/pages/2-4-… is licensed under CC BY 4.0.
Bacteria with a thick peptidoglycan layer retain the primary stain, crystal violet, during decolorization and are referred to as Gram-positive. Gram-positive bacteria appear purple when viewed under the microscope.
Bacteria with a thin layer of peptidoglycan and an additional lipopolysaccharide layer lose the primary stain during decolorization and retain the counterstain safranin. These bacteria are referred to as Gram-negative. Gram-negative bacteria appear pink-red when viewed under the microscope.
Reactions to Gram Staining should be identified as either Gram-positive or Gram-negative.
In a known pure culture in which there is only one organism, that organism should be stained only one color. But human error during decolorizing can impact the results of the Gram stain procedure. If the culture is a pure culture, but the stain reaction appears to show both gram-positive and gram-negative reactions, then the staining technique was performed poorly. Either the organism was over decolorized, and a gram-positive organism is staining as a gram-negative organism; or, the organism was under-decolorized, and a gram-negative organism is staining as a gram-positive organism. In addition, older bacterial cells may sustain damage to their cell walls over time; this can cause some gram-positive cells to appear gram-negative even if the species is truly gram-positive. For this reason, it is important to use fresh bacterial samples when gram staining.
If the culture is not a pure culture, and there are two or more organisms present in the smear, then it becomes important to view morphologies (cell shapes) and stain reactions (by color) to further differentiate the organisms.

Micrograph of gram-positive cocci mixed with gram-negative rods
Creative Commons 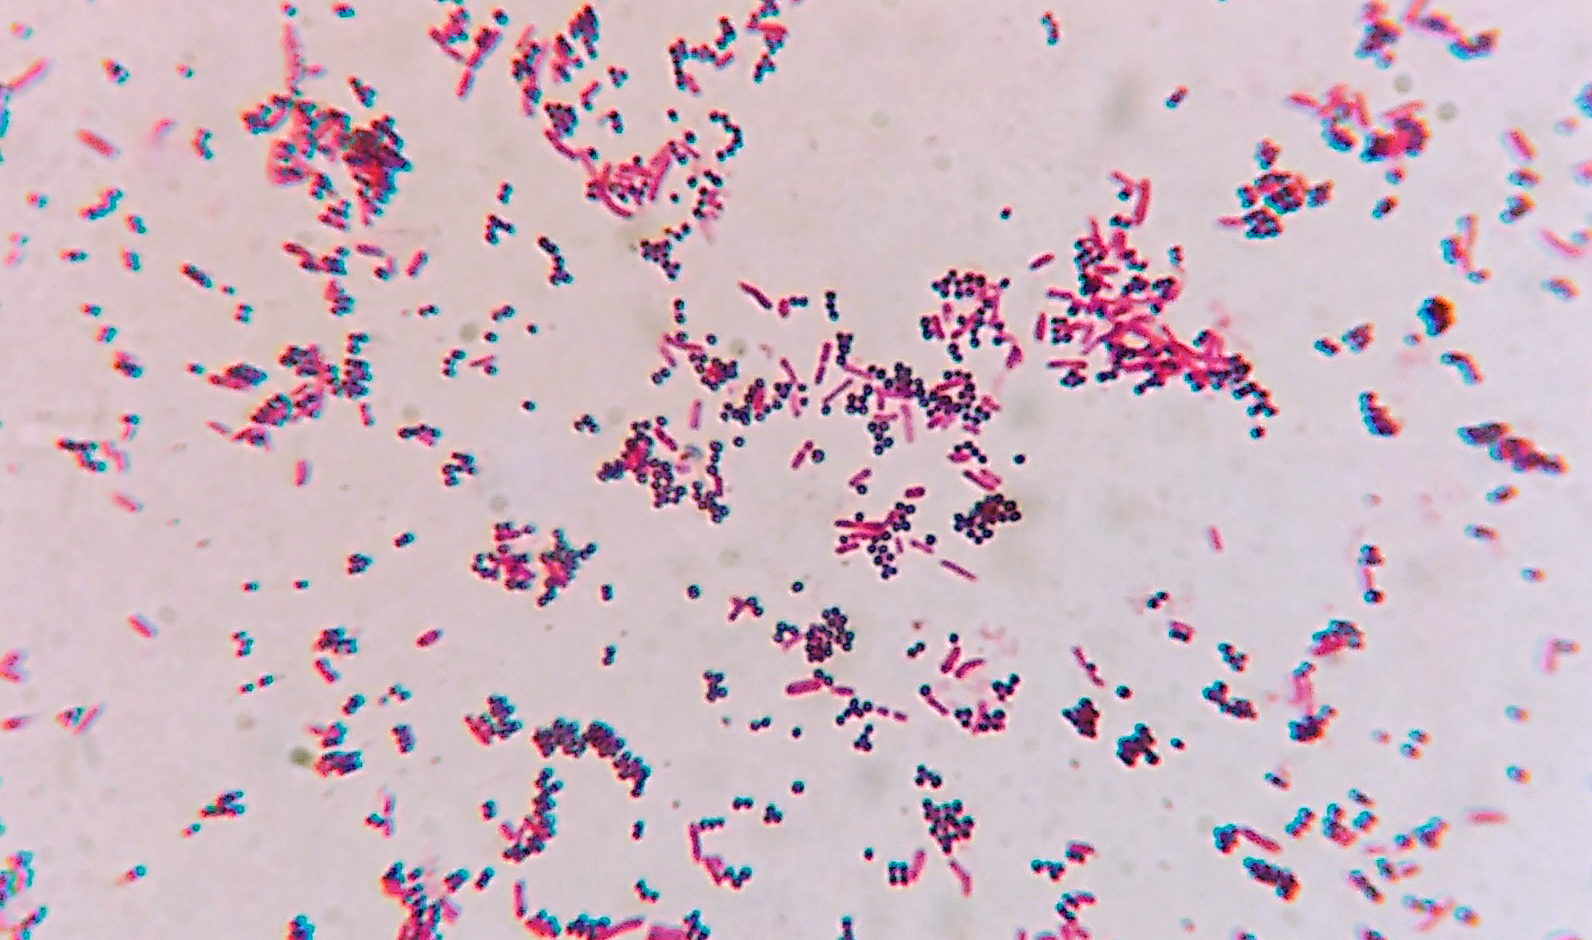
by Microrao, CC BY-SA 4.0
Acid-fast Stain
While the majority of bacterial organisms are stainable by Gram staining, a few, particularly the Mycobacteria, which cause tuberculosis, are resistant and can only be visualized by the acid-fast method of staining. The acid-fast stain distinguishes different types of bacteria based on the wax content of their cell wall.
The characteristic difference between the Mycobacteria and other microorganisms is the presence of a thick, waxy wall that makes penetration by stains extremely difficult. The acid-fast stain uses three different reagents. Carbol fuchsin is the primary stain, and it stains all cells pink/red. The decolorizer is acid-alcohol. On application of acid-alcohol, acid-fast cells will be resistant to decolorization and will stay a red color. For non-acid-fast organisms, the primary stain is removed during decolorization. The counterstain is methylene blue, and will stain the unstained, non-acid-fast cells a blue color.

The Acid-fast Staining Process
Creative Commons https://upload.wikimedia.org/wikipedia/commons/1/1… by Elizabeth Gray, CC BY-SA 4.0
Bacteria with high wax content, which will not readily stain with the Gram stain, retain the primary stain carbol fuchsin when decolorized with acid-alcohol. These bacteria will appear pink/red and are called acid-fast. Bacteria with low wax content in their cell wall lose carbol fuchsin when decolorized and then take up the counterstain methylene blue. These bacteria appear blue and are called non-acid-fast.
Reactions to Acid-fast Staining can be either Acid-Fast when the pink/red cells are seen or Non-Acid-Fast when the cells appear blue.

Pink red rods of the Acid-fast bacilli Mycobacterium tuberculosis in sputum smear
Creative Commons 
by Microrao, CC BY-SA 4.0
SPECIAL STAINS:
Special stains can also be used for the visualization of specific bacterial cell structures. Three stains are commonly done in the microbiology lab: endospore stain, capsule stain, and flagella stain. Detecting these structures is an important step in their identification. Historically, staining techniques were used for detection; currently, most of the fine structural details are examined using an electron microscope.
Endospore Stain
During growth, some bacteria form an endospore within the cell and release it upon death of the cell. A free spore can survive in extreme environments. In favorable conditions, a spore can germinate to once again yield a vegetative cell.
The endospore stain is performed to visualize the spores in Cl
Mesa Community College Aseptic Techniques Lab Questions
Description
Lab 3
Aseptic Technique
Introduction: Connecting Your Learning
Microorganisms are always present in the air and on laboratory surfaces, benches, and equipment. They can serve as a source of external contamination and interfere with experimental results unless proper techniques are used to prevent contamination. The technique that is most often used to prevent the contamination of culture is called the aseptic technique. This technique is important for the growth, isolation, and identification of microorganisms in the laboratory.
| Multimedia Resources | |
| Required Assignments |
Lab 3 Assignment |
Focusing Your Learning
Course Competency
- Utilize aseptic technique for safe handling of microbes.
As you work through this lab, consider the objectives below.
Lab Objectives
By the end of this lab, you should be able to:
- Identify techniques for aseptic handling, transfer, and disposal of microbial organisms in the lab.
- Define how to maintain cultures, emphasizing transfer and isolation of microorganisms.
Background Information
Please watch and take notes on this aseptic technique video: Aseptic Technique Video
Aseptic technique
In nature, most microbes are found growing in environments that contain many different organisms. Unfortunately, these mixed cultures are of little use in studying microorganisms because of the difficulty in determining which organisms are responsible for any observed activity. In order to grow and identify the microorganisms, the microorganisms must be isolated from one another in the specimen.
This process is done by transferring the microorganisms from one vessel to another or from culture to various media for maintenance and study. Such a transfer is called subculturing and must be carried out under sterile conditions to prevent possible contamination. The purpose of subculturing is to obtain separate cultures, each containing only one species of microorganism. A culture containing a single unadulterated species of cells is called a pure culture. Pure cultures contain only one type of organism and are suitable for the study of their cultural, morphological, and biochemical properties. This is of extreme importance in preparing and maintaining cultures as well as in microbiological test procedures. To isolate and study microorganisms in pure culture, the microbiologist requires basic techniques such as aseptic technique.
Subculturing enables one to go from a mixed culture plate that contains many different colonies to a pure culture containing just one type of microbe.

This agar plate contains mixed cultures from a swab performed at a hospital on patient elevator buttons and escalator rails.
Creative Commons 
by Jnims, CC BY-SA 3.0

A blood agar plate containing a of pure culture Staphylococcus
Creative Commons 
by Bill Branson (Edited by Fir0002)(Edited by Drhx), Public domain, via Wikimedia Commons is licensed under CC BY 4.0.
Aseptic technique encompasses many different processes. Aseptic technique includes the use of gloves to prevent contamination from people, the use of heat to kill microorganisms on transfer equipment such as needles or loops, and transfer techniques to isolate microorganisms on culture media.
The following table summarizes basic vocabulary concerning the aseptic discussion.
| Term | Definition |
|---|---|
|
Antisepsis |
Refers to the killing or removal of microbes on living tissues. Sepsis is bacterial contamination. |
|
Clean |
“Clean” has a very restricted meaning in microbiology. Generally it means the removal of dirt or debris superficially. It does not kill or remove all microbes. |
|
Disinfection |
Refers to the killing of microbes on inanimate objects or materials (non-endospore-forming). |
|
Germicide/Biocide |
A chemical agent that demonstrates killing power against various microbes. -cide = means to KILL (excluding endospores). |
|
Pasteurization |
A heating process that reduces the number of spoilage germs and eliminates pathogens in milk and other heat sensitive foods. |
|
Sanitization |
Usually used by the food industry. Reduces microbes on eating utensils to safe, acceptable levels for public health. Generally reduces microbial counts. |
|
Static |
Processes or chemical agents that inhibit bacterial growth but do not necessarily kill microbes. |
|
Sterilization |
Kills or removes all forms of life, including bacterial endospores. |

The microbial growth on this plate is the result of contamination. Multiple colonies exhibiting various different cultural characteristics are present.
Creative Commons 
by Garnhami, CC BY-SA 4.0
Described below are essential steps that one must follow for aseptic transfer of microorganisms.
- An inoculating needle or loop must always be sterilized by holding it in the hottest portion of the Bunsen burner flame, the inner blue cone, until the entire wire becomes red-hot. An incinerator can be used instead of a Bunsen burner. Then, the upper portion of the handle is rapidly passed through the flame. Once flamed, the loop is never put down but is held in the hand and allowed to cool for 10-20 sec. The stock culture tubes and the tube to be inoculated are held in the palm of the other hand and secured with the thumb. The two tubes are then separated to form a V in the hand.

Preparing to flame a loop
Creative Commons 
by Samuel Larson, CC BY 4.0
- The tubes are uncapped by grasping the first cap with the little finger, the second cap with the next finger, and lifting the closures upward. Once removed, these caps must be kept in the hand that holds the sterile inoculating loop or needle, thus the inner aspects of the cap point away from the palm of the hand. They must never be placed on the laboratory bench because doing so would compromise the sterile procedure. Following removal of the closures, the necks of the tubes are briefly passed through the flame and the sterile transfer instrument is further cooled by touching it to the sterile inside wall of the culture tube before removing a small sample of inoculum. The necks of the tubes are flamed to prevent contamination of the tube from the outside environment, to prevent the sterile needle from becoming contaminated if it touches the neck of the tube, and to prevent the bacteria inside the tube from leaving the tube.
- Depending on the culture medium, a loop or needle is used for removal of the inoculum. Loops are commonly used to obtain a sample from a broth culture. Either instrument can be used to obtain the inoculum from an agar slant culture by carefully touching the surface of the solid medium in an area exhibiting growth so as not to gouge into the agar. A straight needle is always used when transferring microorganisms to an agar deep tube from both solid and liquid cultures.
- The cell-laden loop or needle is inserted into the subculture tube. In the case of a broth medium, the loop or needle is shaken slightly to dislodge organisms; with an agar slant medium, it is drawn lightly over the hardened surface in a straight or zigzag line. For inoculation of an agar deep tube, a straight needle is inserted to the bottom of the tube in a straight line and rapidly withdrawn along the line of insertion. This is a stab inoculation.
- Following inoculation, the instrument is removed, the necks of the tubes are reflamed, and the caps are replaced on the same tube from which they were removed.
- The needle or loop is again flamed to destroy remaining organisms.
The following are examples of how to perform aseptic technique to transfer microbes:

Creative Commons by Microbiology: A Laboratory Manual 6th ed. is licensed under CC BY 4.0.
How to perform aseptic technique when inoculating from a test tube
Figure:
- Label the tube to be inoculated with the name of the organism and your initials.
- Place the tubes in the palm of your hand, secure with your thumb, and separate to form a V.
- Flame the needle or loop until the entire end is red.
- With the sterile loop or needle in hand, uncap the tubes.
- Flame the necks of the tubes by rapidly passing them through the flame once.
- Slant-to-broth transfer: Dislodge inoculum by slight agitation. Broth-to-slant transfer: Following insertion to base of slant withdraw the loop in a zigzag motion. Slant-to-agar deep transfer: Insert the needle to the bottom of the tube and withdraw along the line of insertion.
- Flame the necks of the tubes by rapidly passing them through the flame.
- Recap the tubes.
- Reflame the loop or needle.

Creative Commons by Microbiology: A Laboratory Manual 6th ed. is licensed under CC BY 4.0.
How to perform aseptic technique when inoculating from an agar plate
Figure:
- Flame the straight needle until the entire wire is red.
- After inoculating a discrete colony on the agar streak plate, touch the straight needle to the surface of the selected colony.
- Uncap the agar slant and pass the neck of the tube rapidly over the Bunsen burner flame.
- Inoculate the slant by drawing the needle upward in a zigzag motion along the surface of the agar. Do not dig into the agar.
- Flame the neck of the tube and recap.
- Flame the inoculating needle.
Using a subculturing process, microorganisms in the specimen are repeatedly transferred from culture to culture until colonies appear that are separate from one another. Colonies are individual, macroscopically visible masses of microbial growth on a solid medium surface, each representing the multiplication of a single organism. Once the discrete colonies are obtained, an aseptic transfer is made onto nutrient agar slants for the isolation of pure cultures.
The techniques commonly used for isolation of discrete colonies initially require that the number of organisms in the inocolum be reduced. The decrease in the population ensures that, following inoculation, individual cells will be sufficiently far apart on the surface of the agar medium to cause a separation of the different species present. The following are subculturing techniques that can be used to accomplish this necessary dilution and isolation of colonies.
The streak-plate method is a rapid qualitative isolation method. It is essentially a dilution technique that involves spreading a loopful of culture over the surface of an agar plate. In the streak-plate method, a loop is used to streak the mixed sample many times over the surface of a solid culture medium in a Petri plate. The process of streaking the loop repeatedly over the agar surface causes the bacteria to fall off the loop one by one and to be distributed over the agar surface, where each cell develops into a colony. Although many types of procedures are performed, the four-way or quadrant streak will be described.

Flaming a loop: The loop is sterilized by holding it in the hottest portion of the Bunsen burner flame, the inner blue cone until the entire wire becomes red-hot. Then it must be cooled 10-20 seconds before it can be used.
Creative Commons 
by CSIRO, CC BY 3.0
- Using a flamed and cooled loop, place a loopful of culture on the agar surface. Flame and cool the loop, then drag it rapidly several times across the surface of area.
To avoid digging into the agar as one streaks the loop over the top of the agar, one must keep the loop parallel to the agar surface.

Step 1 to streak a plate
Creative Commons https://commons.wikimedia.org/wiki/File:Streak_pla… by PNG: Wikipedysta:Reytansvg: Marek M (talk) 11:44, 3 May 2011 (UTC), Public domain, via Wikimedia Commons is licensed under CC BY 4.0.
- Reflame and cool the loop and turn the Petri dish 90º. Then touch the loop to a corner of the culture in area 1, and drag it several times across the agar in area.
The loop should never enter area 1 again.

Step 2 to streak a plate
Creative Commons https://commons.wikimedia.org/wiki/File:Streak_pla… by PNG: Wikipedysta:Reytansvg: Marek M (talk) 11:44, 3 May 2011 (UTC), Public domain, via Wikimedia Commons is licensed under CC BY 4.0.
- Reflame the loop and cool the loop, and again turn the dish 90º. Streak area 3 in the same manner as area 2.

Step 3 to streak a plate
Creative Commons https://commons.wikimedia.org/wiki/File:Streak_pla… by PNG: Wikipedysta:Reytansvg: Marek M (talk) 11:44, 3 May 2011 (UTC), Public domain, via Wikimedia Commons is licensed under CC BY 4.0.
- Without reflaming the loop, again turn the dish 90º and then drag the culture from a corner of area 3 across area 4, using a wider streak. Do not let the loop touch any of the previously streaked areas. The flaming of the loop at the points indicated is to affect the dilution of the culture so that fewer organisms are streaked in each area, resulting in the final desired separation.

Step 4 to streak a plate
Creative Commons https://commons.wikimedia.org/wiki/File:Streak_pla… by PNG: Wikipedysta:Reytansvg: Marek M (talk) 11:44, 3 May 2011 (UTC), Public domain, via Wikimedia Commons is licensed under CC BY 4.0.
The following pictures are examples of the streak-plate method:

Streaking a plate using an inoculation loop
Creative Commons https://commons.wikimedia.org/wiki/File:Utstryksme… by Lucas R, CC BY-SA 4.0

Campylobacter jejuni colonies isolated on blood-free, charcoal based selective medium (CSM).
Creative Commons 
by Kubo Michal is licensed under CC BY 4.0.
The spread-plate technique requires a previously diluted mixture of microorganisms to be used.

Serial dilution dilutes a fixed volume of cells mixed with dilution solution using the previous dilution as an inoculum. The result is dilution by an exponentially growing factor. (modification of work by Leberechtc/Wikimedia Commons)
Creative Commons https://openstax.org/books/microbiology/pages/9-1-… is licensed under CC BY 4.0.
To make a spread plate, the cells are evenly spread over the surface of a solid agar medium using a sterile, L-shaped bent rod while the Petri dish is rotated. (This can be accomplished while the plate is spun on a lazy Susan-type turntable). The step-by-step procedure for this technique is as follows:
- Place the bent glass rod into the beaker and add a sufficient amount of 95% ethyl alcohol to cover the lower bent portion.
- With a sterile loop, place a loopful of culture in the center of the nutrient agar plate (that has been placed on the turntable if using the turntable). Alternatively, pour or pipette sample onto the agar. Replace the cover.
- Remove the glass rod from the beaker, and pass it through the Bunsen burner flame with the bent portion of the rod pointing downward to prevent the burning alcohol from running down one’s arm. Allow the alcohol to burn off the rod completely. Cool the rod for 10-20 sec.
- Remove the Petri dish cover and if using the turntable, spin the turntable.
- Lightly touch the sterile bent rod to the surface of the agar and move it back and forth to spread the culture evenly over the agar surface.
- Replace the cover. Immerse the rod in alcohol and reflame.

Spread plat
Vulnerability and Threat Assessment Report
Description
Project 1: Vulnerability and Threat Assessment
Step 1: Classify Aspects to Be Addressed
Before beginning the vulnerability assessment, you must first create a preliminary classification of mission-critical aspects to be addressed in the assessment. Determine what “secure” means to the organization by reviewing the topic of cybersecurity vulnerability, evaluating existing business practices, and interviewing senior personnel.
Prepare an overview of the mission-critical aspects of the organization’s current processes. Include personnel, physical security, network security, and cybersecurity in the overview. You will use this overview to prepare a scope of work in the following step.
Step 2: Create a Scope of Work (SoW)
In this step, you will perform a vulnerability assessment once again as the CISO. Since the previous contractor was an external consultant, you will be able to offer insights and consider the big picture of the organization when conducting the assessment. You will prepare for the assessment by creating a comprehensive list of security needs based on findings from the previous step. This list should identify threats, risks, and vulnerabilities to achieve a holistic view of the risk across the entity.
The scope of work is the key element to any project and important to learn. It should be filed as supplementary documentation for purposes of evaluating execution and directional purposes of meeting milestones of a multiphase comprehensive project plan within the vulnerability assessment. The scope of work will be the first section of the final vulnerability assessment report.
Combine the overview from the previous step with the list of security needs into a one-page SoW report. Submit the report for feedback.
Step 3: Develop a Comprehensive Work Breakdown Structure (WBS)
Within the previous step, the SoW report conveyed a brief overview of the organization’s critical aspects and a list of the organization’s security needs. Now, you are ready to develop a comprehensive work breakdown structure (WBS).
This breakdown provides more detail, so you will need to devise examples of procedures you might recommend to your organization. Some examples include a penetration test, baseline analysis, or system logging. Note the tools and techniques to use in conducting a vulnerability assessment to be used later in the project.
Using a spreadsheet, create the comprehensive work breakdown structure, including key elements that must be tested and analyzed. Organize the spreadsheet using the elements identified in the SoW from the previous steps and the following:
internal threats: personnel, policies, procedures
external threats: systems, connectivity, databases
existing security measures: software, hardware, telecommunications, cloud resources
compliance requirements: legal aspects (federal, state, and local), contractual demands up and down the supply chain
Note the security threats and vulnerabilities. This plan will serve as the second section of the final vulnerability assessment report.
Step 4: Explain Security Threats and Vulnerabilities
In the previous step, you developed a comprehensive work breakdown structure. In this step, you will explain the security threats and vulnerabilities included in the plan. In the explanations, consider relevant concepts such as the threat modeling process and third-party outsourcing issues. Include system and application security threats and vulnerabilities.
Reference aspects that are not being included. Note that you would need to obtain management agreement with the initial analysis of mission-critical components to be included in the assessment. This phase includes management input into the prioritization process of all risks from internal and external sources.
This information will be used in the following steps to develop the threats and vulnerabilities report, which will then be included in the Final Vulnerability Assessment Report.
Next, you will classify the risk of threats and vulnerabilities.
Step 5: Classify the Risk of Threats and Vulnerabilities
Throughout this project, you have developed a foundation for the vulnerability and threat assessment by classifying critical organizational aspects, creating a scope of work, and explaining security threats and vulnerabilities. Now, you are ready to classify the organization’s risk according to the relevant data determined in the project plan.
Company demands, management input, compliance requirements, and industry probability of exploitation are all considerations when classifying the risk of threats and vulnerabilities. Based on these considerations for the midsize government contracting group, further clarify the vulnerabilities and threats you have itemized. Explain why each is a vulnerability or threat, as well as why it is relevant to the overall assessment.
Consider continuous monitoring issues as you work through the classification. Use the threat and vulnerability explanations from the previous step and risk classifications from this step to develop the threats and vulnerabilities report.
In the next step, you will prioritize the threats and vulnerabilities you have explained and classified.
Step 6: Prioritize Threats and Vulnerabilities
Now that you have explained and classified the threats and vulnerabilities, you will prioritize them using a reasonable approach as explained in the project plan. As you prioritize the identified threats and vulnerabilities, you will need to:
- include both internal and external sources of threats
- consider assessment of exposure to outages
- consider information resource valuation
- indicate which approach you are using and justify your choice
Use this information, along with the threat and vulnerability explanations and risk classifications from the previous steps, to develop the threats and vulnerabilities report.
Compose a two- to three-page report regarding specific threats and vulnerabilities of the technical aspects of the environment. This report will be used in the final vulnerability and threat assessment report.
Submit the threats and vulnerabilities report for feedback.
Step 7: Analyze Network Analysis Tools
Now that you have finished the threats and vulnerabilities report, you will analyze how network analysis tools are employed to identify vulnerabilities.
Earlier in the project, as you developed the comprehensive project plan, you should have read about tools and techniques available for vulnerability assessment activities. Research the tools relevant to the project plan and provide a cogent analysis of which tool or tools to recommend for this project. Consider threat remediation and make special note of tools used to identify software communications vulnerabilities.
Include the findings in a one- to two-page report, including a justification of your decision based on peer-reviewed reference materials cited in APA format. This report will be used in the final vulnerability and threat assessment report.
Submit the network analysis tools report for feedback.
Step 8: Assess Vulnerabilities and Threats
So far, you have considered the scope of work to complete a vulnerability and threat assessment for the organization, created a comprehensive work breakdown structure, explained, classified, and prioritized threats and vulnerabilities, and have chosen the network analysis tools to be used. It is finally time to assess vulnerabilities.
Using the Vulnerability and Threat Assessment Matrix template, complete the vulnerability assessment for your organization. This matrix will serve as Appendix B of the final report.
Step 9: Review and Record Findings
After completing the vulnerability and threat assessment in the previous step, you should now take time to review and consider your findings. Review the work you have completed and the feedback that you have received. Record any lessons that you have learned that may be beneficial in the future.
Issues that may be addressed include whether nontechnical factors should be considered during the vulnerability assessment, the point at which the assessment is complete, next steps, and any other issues that you noticed throughout. Record your notes thoroughly, as they will be the basis for the “lessons learned” report completed in the next step.
Step 10: Write Lessons Learned Report
Based on the work done and research accomplished, consider what you have learned so far. Build upon the findings recorded in the previous step to write a lessons learned report.
Is a vulnerability and threat assessment a technical undertaking only, or should it consider other factors? When is the assessment complete? What are the “next steps” based on your assessment? These are some examples of issues that should be addressed. This report will serve as the conclusion of the final report.
- Submit a two- to three-page report of lessons learned for feedback. Once this reflection is complete, you will be ready to compile the overall vulnerability and threat assessment report. In the next step, you will revise your findings as necessary.
- Step 11: Review and Revise Report Sections
Now that you have completed all the major sections of the vulnerability and threat assessment, it is time to prepare the individual sections of the final report. Review the feedback from the SoW, Work Breakdown Structure, Threats and Vulnerabilities Report, Network Analysis Tools Report, Vulnerability and Threat Assessment, and Lessons Learned Report. Make any appropriate revisions to incorporate the received feedback. Compile the findings in preparation to submit the final report.
- Once the revisions are complete, the final report is ready to submit in the last step.
Step 12: Write Overview and Compile Final Vulnerability and Threat Assessment Report
- You have reached the final step. Use the Final Vulnerability and Threat Assessment Report template in preparing the final report. In APA style, write an overview and compile all the sections prepared throughout the project into a report according to the template.
Since this report will be delivered to Maria and other top executives, tailor your writing to the appropriate audience. Be sure that coherent paragraphs or points are developed so that each is internally unified, functioning as part of the whole document.
When you are finished, submit the final report.
WLAC Geology Practice Quiz
Description
Flag question: Question 1Question
1. What is the largest component of Earths atmosphere
Group of answer choicesOxygen
Nitrogen
Water Vapor
Carbon Dioxide
Flag question: Question 2Question
2. The strongest greenhouse gas
Group of answer choicesMethane
Dust
Carbon Dioxide
Water Vapor
Flag question: Question 3Question
3. A temperature inversion is characterized by air temperature that
Group of answer choicesincreases with altitude
nobody knows
stays the same
decreases with altitude
Flag question: Question 4Question
4. Atmospheric pressure at sea level is generally
Group of answer choiceshow would I know?
lower than in the mountains
stays the same as in the mountains
higher than in the mountains
Flag question: Question 5Question
5. Its a cool and cloudy morning at Long Beach. The temperature is 62 and the dewpoint is 59. A pilot takes off from Long Beach airport and notices the temperature jumps to 85 degrees at an altitude of 3,000 ft along his initial ascent where the sun is shining and the sky is a stunning blue above a white ocean of clouds. This weather scene is technically known as a
Group of answer choicescyclogenesis
offshore wind
temperature inversion
sign of convective instability
Flag question: Question 6Question
6. What heats up and also cools down slower?
Group of answer choicesland
land and water
water
neither
Flag question: Question 7Question
7. A typical storm is usually known as?
Group of answer choicesa dynamic high
a thermal low
a thermal high
a dynamic low
Flag question: Question 8Question
8. The ITCZ or Inter Tropical Convergence Zone is a good example of a
Group of answer choicescold frontal system
warm and dry airmass
mid latitude cyclone
global equatorial zone
9. Its 40 degrees Fahrenheit in the Great Basin of Nevada on a particular day in November. The surface winds are blowing out of the area in response to this cold weather, what kind of a weather system is this indicative of (over the Great Basin)?
Group of answer choicesdynamic low
thermal high
dynamic high
thermal low
10. Its 95 degrees in Glendale and 65 degrees in Santa Monica, given what we have learned so far about weather and local winds what kind of a wind might you expect between Santa Monica and Glendale (choose the best answer)?
Group of answer choiceshurricane
sea breeze
land breeze
Chinook
11. A sea breeze is an example of
Group of answer choiceshurricane
onshore flow
tornado
offshore flow
12. The following chart indicates areas of wind energy at an altitude of about 30,000 feet or so above sea level.
This jet stream is located
Group of answer choicesbetween Asia and California
over Alaska
across the north pole
over the equator
13. The jet stream in the previous chart is what would normally be expected during
Group of answer choiceswinter
summer
climate change
hurricane formation
14. During the winter the jet stream typically
Group of answer choicesdisappears
gets stronger and further south
gets weaker and further north
is confined to the Arctic
15. The strongest jet stream energy is associated with
Group of answer choiceswarm northern latitudes (Arctic) and cold southern latitudes (equatorial region)
cold northern latitudes (Arctic) and warm southern latitudes (equatorial region)
equal temperatures globally
climate change
16. California’s rain and mountain snow that is common during the winter season is usually a result of
Group of answer choicesstorms being delivered by a strong jet stream
Santa Ana winds with strong high pressure
the sea breeze
weak jet stream energy and warm Arctic temperatures
17. During the summer the jet stream typically
Group of answer choicesaffects California the most frequently
strenthens and heads toward the equator as temperatures warm up
weakens and heads back toward the Arctic as temperatures warm up
stays the same as during the winter
18. Here is a chart of Arctic sea ice concentration since the early 2000s until 2019. There is an abrupt curve exhibited on this graph with Arctic sea ice volume sharply declining (and a lot of ice melting) between April until September. This is a result of
Group of answer choicesmanipulated data as there has not been any Arctic sea ice in the summer for nearly a decade
the sun being directly overhead and shining on the Arctic continuously with 24-hour sunlight and no sunset and no night for 6 months straight at the North Pole
global warming also known as climate change
instrumentation error as it is very difficult to get accurate readings that far north in the world
19. Some of the most extreme weather to have ever hit California with multi-decades-long drought, searing heat characterized by unbelievable temperature readings (133 degrees in Santa Barbara), devastating floods that left huge parts of the state under water for up to 6 months and more happened during the
Group of answer choices2000s
mid 1800s
early 1900s
late 1990s
20. The fact that heat and cold go through fluctuations, with some areas hotter and others colder, some years warmer and others colder and by extension some places drier while others wetter is a result of
Group of answer choicesmysterious processes that have no explanation
fake news since the weather is always similar
increase in global greenhouse gas emissions like Carbon Dioxide
changes in atmospheric pressure configurations that result in what we call weather
21. When the air is warmer near the surface and colder in the upper atmosphere, oftentimes evident by the development of upward rising cumulus clouds, the conditions are said to be
Group of answer choicestectonically active
the result of a temperature inversion
stable
unstable
22. Lightning, heavy rain, strong winds, hail and even tornadoes are the result of
Group of answer choicesatmospheric stability
drought
convection
the marine layer inversion
23. On a particular day not too long ago a cold pocket of air aloft, characterized by temperatures of -23 C (-9 F) at 18,000 feet moved over southern California, associated with a late-season trough of low pressure. During the late morning to early afternoon temperatures were still in the mid to upper 50s under overcast skies with drizzle and even light rain falling around downtown Los Angeles. Temperatures were similarly cool and it was also cloudy in the San Fernando Valley. Meanwhile, skies were partly cloudy across the high desert were temperatures were generally in the mid to upper 60s at the same time. Given this information where would you expect the greatest instability was developing?
Group of answer choicesLos Angeles basin
nowhere
San Fernando Valley
high desert
24. Where would you expect the greatest chance of thunderstorms to form that afternoon?
Group of answer choiceshigh desert
nowhere
Los Angeles basin
San Fernando Valley
Flag question: Question 25 pts
25. If there is a mid-latitude cyclone with cold air aloft moving in, the temperatures near the surface are warmer than above, there is adequate moisture available for cloud formation, the winds at ground level are coming in from the Southeast at 15 knots, as altitude increases the wind is observed to be increasing as well changing direction to South at 5,000 feet , then Southwest at 18,000 feet with a strength of 60 knots. The Doppler radar begins to pick up on a developing and intensifying cell with light green around the edges and yellow, orange and even red toward the middle. If you were a forecaster you would begin to consider the possibility of
Group of answer choicestornadoes
a hurricane
Santa Ana winds
a blizzard
26. Los Angeles rainfall has been
Group of answer choicesdramatically decreasing with permanent drought conditions now the rule
too complicated to think about
continuously increasing with more rain now than ever before
going through cycles of some years having more, others having less and others seeing about average
27. The notion that tornadoes do not occur in California is
Group of answer choicessomething that everyone knows because this is earthquake territory
true because the jet stream stays away
true because there are mountains and valleys
a myth
28. When the temperature and dewpoint temperature are not equal
Group of answer choicesthe air is not saturated
it gets much cooler
the air is saturated
clouds and fog form
KU WK 3 The Muscles of The Thorax and Abdominal Wall Essay
Description
- Fibrous joints: anatomy & example of each: Does this move?
- Cartilaginous joints: subtypes, anatomy & example of each, Does this move?
- Synovial joints- subtypes, anatomy & example of each, Does this move?
- Stability vs Range of motion: The story of 2 bones meeting. Ligaments/bursa
- Lever systems: Types and examples in the body
- Antagonist, Prime movers and Synergists
- Be different! The Importance of differences: skeletal vs smooth vs cardiac muscle with examples
- Four muscles of mastication- Origin, Insertion, Action
- TMJ joint: Bones that form it, anatomy, movements, TMJ dysfunction
- The Shoulder joint: Bones that form it, Range of motion, common dysfunctions compared to normal structure
- The Elbow joint: Bones that form it, movements & examples, common dysfunctions compared to normal structure
- The Hip joint: Bones that form it, Range of motion, common dysfunctions compared to normal structure
- The Knee joint: Bones that form it, Range of motion, common dysfunctions compared to normal structure
- The Ankle foot: Bones that form it, Range of motion, common dysfunctions compared to normal structure
- Foot: special movements. extrinsic vs intrinsic muscles.
- Important vertebral joints: axialocciptial & alantoaxinal joints, intervertebral joint anatomy. Range of motion for the spine.
- Winged! The scapula: location, anatomy, special movements, How does it attach to body?
- Muscles of the back: superficial to deep- How is it organized?
- Breathe! Muscles of the thorax & abdominal wall: rib muscles, diaphragm
- Why do I have to do so many types of sit ups? Muscles of anterior abdominal wall, layers- superficial to deep, origin/insertion, fiber orientations vs purpose, hernias
- Muscles of the Rotator Cuff: Break it down and injuries
- Carpal tunnel syndrome vs Normal anatomy: Muscles of the forearm and hand
- Muscles of hip and thigh- functional groups, compartments, names, function
- Kick me! Muscles of leg and foot- functional groups, compartments, names, function and special movements
- Contract me! The sarcomere: How we organize function in the skeletal muscles. The Sliding Filament theory explained.
- Types of Proteins in the muscle: microscopic structures- thin, thick and other
- Follow the movement of Calcium: A walk through muscle contraction
- Neurotransmitters in the muscle: NMJ and The story of acetylcholine and the motor end plate
- Tone: The story of the motor units in the muscle.
- Posture and stability
- Force of contraction: What are the different aspects to gain strength vs fine motor control
- The All or None principle
- The story of Sodium and Potassium within Nerve and Muscle function.
- Types of Contraction: isometric vs isotonic contractions with examples.
- The Athletes and their sport: red vs white fibers
- Men vs Women and muscle mass: Research says:
- Feel the burn! Energy sources: Lactic acid and the story of Oxygen
- Arnold vs the Blade Runner: The anatomy of bulking up with weights vs running
- Connect the dots: ATP and Mitochondria in muscle.
- Strain vs Sprain vs Cramp compared to normal structure and function
Reply:
Marie Norton
Claimed Topic
38. Arnold vs the Blade Runner: The anatomy of bulking up with weights vs running
Research
Cardio or weight training? That is one of the most common and basic questions one will find themselves asking when signing up for a gym. Cardio such as running or swimming will help you achieve a more toned look. Weightlifting with a constant progression overload will help you bulk up. When one wishes to tone up, they try to reduce their body fat to tighten the muscle and give it shape. To bulk up is to try and accumulate as much muscle mass as you can. There is no right or wrong answer to which one is “better.” It all comes down to what fitness goal YOU are trying to reach. With that being said, the two are as different as night and day.
Cardio – Cardio is short for cardiovascular conditioning. It’s an aerobic exercise that relies on oxygen to get your breathing and heart rate up. Getting your heart rate up is essential to promote blood flow through your body. This whole process will allow you to burn many calories, which is why it’s the way to go if your goal is weight loss. In addition to weight loss benefits, cardio is terrific for your overall health. Keeping your heart pumping like this will allow your heart and lungs to move oxygen through your body efficiently.
Weight lifting – this is an anaerobic exercise. It does not rely on oxygen in the way cardio does. Instead, the activities performed here to break down glucose for energy. Weight lifting produces stress on your muscles which causes micro-tears in them. These micro-tears are where you will begin to bulk if followed by the appropriate diet. After a rigorous training session of weight lifting, one must eat a lot of protein, at least 0.8 grams per kilogram of body weight. This will help feed those muscle tears with protein which is essentially the building blocks of muscle. Another critical component of this diet is making sure you eat your carbs. As mentioned, weight lifting breaks down glucose for energy which can be replenished with healthy complex carbs. The benefits of weight training will have you burning calories all day and help to prevent any future injuries.
Critical thinking
As an avid gym-goer myself, my favorite thing to do is resistance weight training. So I’ll go to the gym and lift weights, do squats, bench press, etc. However, a mixture of both cardio and weights is the most ideal. You’ll have the best of both worlds! Both do wonders for your health. So to conclude, cardio will burn more calories during your workout and burn fat faster. Weight training will help you burn calories all day and help you accumulate muscle mass.
Word Count: 449
References
Millhone, C. (2020, March 11). Cardio vs. weights: Which is better for your fitness goals? Greatist. Retrieved April 18, 2022, from https://greatist.com/health/cardio-vs-weights
Thaxton, J. (n.d.). Toning vs. Bulking up: What’s the difference? NASM. Retrieved April 18, 2022, from https://blog.nasm.org/toning-vs-bulking-up
Reply:
Elvie Jacinthe
Claimed Topic
6. Antagonists, Prime movers, and Synergists
Research:
The human body is composed of muscles that work together to support the motion and tasks we perform. One of these muscle functions includes the upper arm and forearm. It consists of three bases, the prime mover, synergist, and antagonist. The prime mover also called an agonist, is mainly responsible for the human arm’s movement. It assembles the most power throughout a joint operation and includes the muscle, biceps brachii, which functions as a flexor (Saladin et al., 2021, p. 305).
The synergist plays a role in this action by assisting the prime mover. It proceeds as a double force for the flexor due to its muscle, brachialis. The biceps brachii extends over the brachialis and work together to help bend the elbow (Saladin et al., 2021, p. 305). Both of these muscles are connected but are not very alike. For example, the synergist secures the joint with the aim that the prime mover does its role of performing a gesture (Saladin et al., 2021, p. 305).
The antagonist is the complete flip-side of a prime mover function. An antagonist is a muscle relaxer that attentionally reduces the speed of a movement without taking absolute control over the prime mover. The purpose is to help human beings grasp various objects into their hands without receiving a fracture (Saladin et al., 2021, p. 305). While the elbow flexes, the prime mover becomes the brachialis, and the antagonist takes the form of the triceps (Saladin et al., 2021, p. 305). Each of these plays a role in supporting our activities.
Critical Thinking:
After researching the functions of antagonists, prime movers, and synergists, Ive gained a lot of knowledge of what each muscle does in those areas to make sure we sustain a balance in both movement and pace. For example, if I decide to go out and jump rope. These functions would begin to apply by allowing me to lift the rope without too much stamina in the arm and place it in my hands. Then I could start rotating the jump rope while jumping as my upper arms move forward to make sure I do not swing out of control.
Word Count: 327
References
Saladin, K., Gan, C., & Cushman, H. (2021). Anatomy & physiology the unity of form and function (9th ed.). McGraw-Hill Education.
University of Florida PHA Biology Questions
Description
- List the forms of nitrogen in the nitrogen cycle in order of most oxidized to the most reduced form. [2]
- What are the two key enzymes involved in nitrogen fixation? How does molecular oxygen affect the reductase complex? How is this overcome? [3]
- Compare how glutamate is formed in plants and bacteria versus its formation in animals. [2]
- a) What two amino acids normally supply the nitrogen required for amino acid and nucleotide synthesis? b) What molecule i s a common intermediate in the synthesis of several amino acids AND in nucleotide synthesis? [2]
- a) How is glutamine used in nitrogen metabolism?
b) Why is the activity of glutamine synthetase tightly regulated? [2] - What is meant by the term essential amino acid? List the six primary precursors used to derive the 20 common amino acids. [2]
- Describe the role of PLP in the biosynthesis of serine, glycine and cysteine. [2]
- List the amino acids synthesized from oxaloacetate and pyruvate. Which amino acids are essential and which are non-essential? [3]
- In what way is the role of ATP in histidine biosynthesis unusual? Propose a possible fate for the inorganic phosphate released at step 8 in histadine biosynthesis. [2]
- Briefly describe the regulatory mechanisms involved in purine and pyrimidine nucleotide synthesis. What is the role of aspartate transcarbamoylase? [3]
- Describe the functions of phosphocreatine and glutathione. [2]
- What do all amino acid decarboxylases have in common? Which of the following is not a conversion reliant upon a decarboxylase? [2]
- dopa to dopamine
- glutamate to GABA
- tryptophan to 5-hydroxytryptophan
- a) Which molecules contribute the nitrogen atoms for purine biosynthesis?
b) Which reactions in the de novo synthesis of purine nucleotides require energy expenditure? [3] - Describe the similarities and differences in the de novo synthetic schemes of purines and pyrimidines. [2]
- What happens to purine biosynthesis when excessive AMP accumulates? [2]
- How are nucleotide monophosphates are converted to nucleotide triphosphates? [2]
- How are deoxyribonucleotides are formed from ribonucleotides? [2]
- How do ATP and low and high concentrations of dATP affect the activity of ribonucleotide reductase? [2]
- Using your text and any available web resources, identify a genetic disease that results from an anomaly associated with the biosynthesis of amino acids, nucleotides or related molecules. Provide the name of the disease, its exact biochemical effect on the pathway(s), the resultant physiological and symptomatic aspects, and how it might be treated. [5]
- Locate and read the following article which has implications on the de novo synthesis of guanosine nucleotides . Answer the questions below. [5]
Murali Dhar TG, Shen Z, Gu HH, Chen P, Norris D, et al. (2003) Bioorganic & Medicinal Chemistry Letters, 13 (20): 3557-3560.
- Specifically what reaction does inosine monophosphate dehydrogenase catalyze?
- With respect to the novel small molecule inhibitors of inosine monophosphate dehydrogenase, what general purpose is sought or served by the carbamate side chain?
- What metal is commonly used in the catalysis of the reactions described in this article?
- Why would the scientists be interested in identifying or developing novel small molecule inhibitors of inosine monophosphate dehydrogenase?
- If you were to take on a follow-up study to this research, what might you investigate?
1.Describe the difference between endocrine and paracrine hormones.
2. What are the possible fates of acetyl CoA produced by the liver?
3. What types of lipids are stored in adipocytes? What triggers mobilization of these lipids?
4. List the compounds used as energy sources by each of the following:
a) Skeletal muscle
b) Cardiac muscle
c) Brain
5. Describe how epinephrine coordinates enzyme activity in the gluconeogenic and glycogen breakdown pathways.
6. At the molecular level, what is the effect of glucagon on cell metabolism?
7. What are the effects of epinephrine on each of the following aspects of metabolism:
a) Glycogen breakdown
b) Glycolysis
c) Glucagon secretion
d) Insulin secretion
8. During conditions of fasting or starvation, what is the limiting factor in using citric acid cycle intermediates for gluconeogenesis?
9. Describe the feedback loop observed in insulin secretion.
10. During starvation what happens to the acetyl co-A made available from stored fats?
11. How are the cellular effects of insulin mediated? How does insulin regulate the activity of glycogen phosphorylase?
12. Adrenalin is stored in and released from membrane bound vesicles. Why are testosterone and estrogen not stored in this manner?
13. Describe the differences between Type 1 and Type 2 diabetes and the kinds of therapy used to control each.
14. Why are peptide hormones are initially synthesized as inactive precursors (prepro- or pro-hormones) and processed to the active hormone?
15. Compare and contrast the mechanisms and locations of the effects of peptide and amine hormones and steroid hormones. (Answer in table form if you wish.)
16. Why are the effects of steroid and thyroid hormones slower in action and lengthier in duration than other types of hormones?
17. What factors are released from the hypothalamus, and what cells do they target?
18. Why are the hormones of the anterior pituitary gland often described as tropic?
19. Cells of the islets of Langerhans are found in the _____________. Glucagon is produced by the ____ cells and insulin by the ____ cells.
20. Which hormones are catecholamines? When acting as hormones, from where are they secreted? Where else might these molecules be found?
21. Briefly describe the major actions of the catecholamines on carbohydrate and lipid metabolism.
22. Describe the general pathways and end products of carbohydrate and lipid metabolism in each of the following mammalian tissues:
a) Liver
b) Adipose
c) Muscle (skeletal and heart)
d) Brain tissues
e) Blood
23. Locate and read the following article. Answer the questions below.
Sandoval DA and Davis SN. (2003) Journal of Diabetes and its Complications, 17 (2): 108-113.
- What exactly is leptin, and how does it relate to the biochemistry of metabolism?
- How do researchers often experimentally induce hypoglycemia?
- Describe how exercise, a stressor, affects the secretion of leptin.
- How might activity of the sympathetic nervous system affect plasma leptin secretion on a molecular level?
- A major function of leptin may be to switch fuel utilization to fat from carbohydrates. T/F
SCI 100 Southern New Hampshire University Natural Science Paper
Description
Course Outcomes
In this project, you will demonstrate your mastery of the following course outcomes:
- Determine fundamental approaches to scientific research in addressing questions related to the natural world
- Develop questions about fundamental aspects of the natural world that inform personal assumptions, beliefs, and values using empirical evidence
- Investigate questions about fundamental aspects of the natural world that inform personal assumptions, beliefs, and values using empirical evidence
- Articulate the value of the natural sciences for their impact on contemporary issues
Overview
This course will introduce you to fundamental ideas in the natural sciences and how scientists study phenomena in the natural world. Having a well-rounded understanding of scientific research is much more than just an academic pursuit. We encounter natural science every day. Consider news headlines about vaccine development, debate about climate change, privatizing space exploration, how bees affect our environment, and whether intestinal health impacts mental health. Think about the conversations youve had with friends and family about weather, gardening, cancer, or black holes. These are all natural science topics!
Being scientifically literate helps you to better understand the world, solve problems, and make informed judgments. It also allows you to evaluate the credibility of claims you hear in the news or from members of your community. A society that understands how science works thinks critically about information, is empowered to make better decisions, and is less likely to be misled by those who distort evidence to promote their own agenda.
In this project, you will use a recent news article to identify a natural science topic that you are curious about. You will explore how research is conducted about the topic, scientific developments that have affected it, and its societal significance. This will provide you with a deeper understanding of scientific research and the fundamental aspects of the natural world.
Directions
Complete this project by addressing the criteria below. You will complete parts of the project in each module and receive instructor feedback. Your final submission will be revisions of the work you do throughout the course. Be sure to incorporate instructor feedback from each assignment along the way. Read these guidelines and rubric criteria closely, and reach out to your instructor if you have any questions.
Part 1: Natural Science Topic Exploration
In this section, you will explore a natural science topic by selecting and analyzing a current news story. You will also reflect on your existing knowledge about the topic. Then, you will identify how research on the topic was conducted as described in the news story.
- Describe the main idea discussed in your chosen news story.
- In other words, what is the key concept or thesis being examined in the news story?
- Explain your prior and desired knowledge regarding the main idea in your news story.
- What do you already know about the topic? Do you have personal experience with the topic? What else would you like to know about it?
- Identify a scientific approach that the scientist(s) used to research the topic.
- Consider the way the topic was studied or how evidence was collected. Consult your article for this information. You do not need to conduct outside research.
Part 2: Fundamental Questions About the Natural World
In this section, you will identify questions you want to answer about your topic. Your finalized question will directly influence the hypothesis you write. Finally, you will consider how your opinions and experiences affected the focus of your hypothesis.
- Finalize your research question related to the main idea in the news story you selected.
- Your finalized question will be based on the questions you began working with earlier in the course.
- Propose a hypothesis based on your finalized research question.
- Make sure your hypothesis is directly related to your finalized research question and is both testable and falsifiable.
- Explain how your personal beliefs, assumptions, and values influenced how you approached writing your hypothesis.
- Think about your preexisting opinions and knowledge about the topic. How might they have affected the focus of your hypothesis?
Part 3: Major Developments in the Natural Sciences
In this section, you will research a significant advancement, discovery, or event that has affected how scientists research your topic. You will also explore the interrelationship between science and ethics.
- Describe one major development in the natural sciences that has impacted how your topic was or may be studied.
- In other words, what advancements or events have changed how scientists research your topic?
- Describe the contributions of a scientist (or group of scientists) who was involved in the major development relevant to your topic.
- You might consider the scientists motivations to study the topic, the challenges they encountered, or how their research changed how we think about the topic.
- Discuss how an ethical issue might impact research on your topic.
- Some examples of ethical issues in science include bias in research, the impact of politics on science, research funding sources, objectivity in science, or the spread of scientific misinformation.
Part 4: The Value of Studying the Natural Sciences
In this section, you will reflect on the benefit of having a deeper understanding of the natural sciences to you personally and to society as a whole.
- Explain how viewing the world through a scientific lens may influence your personal life.
- In other words, how might applying scientific inquiry skills to your daily experiences help you better understand them or take action?
- Articulate how being a more scientifically informed citizen may affect your relationship with your community.
- Think about challenges or opportunities in your community. How might being more scientifically literate benefit your community?
- Discuss how being a more scientifically informed citizen may help you understand global contemporary issues.
- Consider how being scientifically literate could influence how you approach current challenges or questions in the world, even outside the sciences.
What to Submit
To complete this project, you must submit a Word document using 12-point Times New Roman font, double spacing, and one-inch margins. Any sources used should be cited according to APA style. Consult the Shapiro Library APA Style Guide for more information on citations.
ASU The Facial Symmetry Hypothesis and The Sexual Selection Lab Report
Description
Module 6 Lab: Human mate choice
In many human cultures there tends to be agreement over what constitutes attractiveness with people from different societies often agreeing that a given woman or man is attractive. It is less clear, however, what actual traits observers use to make this judgement. In this weeks lab, we are going to test a number of hypotheses to determine if there is a good way to subjectively measure attractiveness.
Background
Sexual selection and good genes hypothesis: Many species display the phenomenon of sexual selection where males display costly ornaments or behaviors (although in some cases it is females that display these costly ornaments or behaviors). According to parental investment theory, the gender that has lower intrinsic investment in reproduction is forced to compete for the attentions of the gender with the higher investment (Trivers, 1972). There is still a fair amount of theoretical discussion concerning the costs and benefits of sexual selection. One perspective, the good genes concept, suggests that costly ornaments are essentially honest signals that the bearer is carrying high quality genes. An animal that is capable of maintaining a large feather display or complicated nest-building behavior must also be generally healthy and the carrier of desirable genetic qualities.
Humans are not exempt from sexual selection theory. Males and females are dimorphic in size and also in secondary sexual characteristics. The human face contains secondary sexual traits that include facial features that may develop or increase in size at puberty. Humans make judgements about the attractiveness of prospective partners based in part on these facial cues. An attractive partner may elicit greater efforts at courtship or more costly displays to gain the attentions of the would-be mate. But how do humans make these judgements about attractiveness?
Facial Symmetry Hypothesis: One hypothesis regarding human attractiveness is facial symmetry. Symmetry is often correlated with genetic heterozygosity in many animals, including humans (Thornhill and Gangestad, 1993). Such heterozygosity may be linked to parasite resistance as well as other diverse positive traits and therefore symmetry may be an indicator of good genes. There is evidence that facial symmetry is positively correlated with scores of attractiveness (Grammer & Thornhill, 1994; Fink et al. 2006), and it may also act as a cue to an individuals personality characteristics (Fink et al., 2006).
Averageness Hypothesis: Another hypothesis is the averageness hypothesis (Thornhill & Gangestad, 1993). Based on this idea, researchers compiled photos of different people. They found that the more peoples faces were averaged together, the higher the attractiveness score became. Thornhill and Gangestad (1993) suggest that facial averageness is attractive because of its association with heterozygosity. It should be noted that the facial symmetry hypothesis and averageness hypothesis are not mutually exclusive.
Questions: In order to investigate these questions, you will be utilizing an interactive website to rate human faces for attractiveness and also to create average faces (in which individual faces are blended together).
Instructions:
Access the website at: http://www.faceresearch.org/demos/average
To create averages, select faces you want to average and they will be show boxed in yellow. To unselect an image, just click it again.
When youve selected the ones you want in your selection, click average. Between trials, click the reset button to clear your previous selections.
Assignment instructions:
Assign attractiveness scores to the first 20 faces of each sex on a scale from 1 10.
Of the 20 faces, choose three women you assigned the lowest scores, and average their faces. Score the new composite face.
Of the 20 faces, choose three women with scores close to 5 and average their faces. Score the result
Of the 20 faces, choose three women with the highest scores and average their faces. Score the resulting face.
Average all 20 female faces. Score the resulting face.
Repeat steps 2-5, using male faces.
Here is a video example of me walking through the lab:
Report Instructions: You will need to submit a formal lab report. The report should be in a word document with the following sections:
Introduction
An introduction containing a description of the basic questions and the premise (ie, what are the researchers testing with their facial averaging software?). Be sure to write and include both a description of each hypothesis (symmetry and averageness) as well as your research questions (Links to an external site.) https://writingcenter.gmu.edu/guides/how-to-write-… related to these.
Materials and Methods
In paragraph format and in past tense, describe the materials you needed and the methods you used to complete this lab. Similar to past modules, we understand this is an online lab so this section is a little difficult, but remember, someone (who is not in this class) should be able to complete the lab based on what you write here so what should you include?
- Results
- You should summarize your findings in a series of data tables AND graphs.
- Submit a data table with your results summarized. Write a summary (in a word document) answering the following:
- Compare scores between the original faces and the average faces you created. How do they differ?
- Compare the scores for the composite faces across the low, medium, and high scoring categories.
- Does the score the average face change with how many individual faces are used to create it?
Submit a graph or graphs illustrating your data
For example, you might include a bar graph (or series of bar graphs) comparing the average attractiveness of the sets of three faces you selected (less attractive, medium attractiveness, and very attractive) before and after averaging.
Discussion
Finally, you should summarize your findings in your lab report.
Was the ‘averageness’ hypothesis supported?
- Was the facial symmetry hypothesis supported?
References
Fink, B, et. al, (2006). Facial symmetry and judgements of attractiveness, health, and personality. Personality and Individual Differences 41: 491-499
Grammer, K, Thornhill, R (1994). Heritable true fitness and bright birds: A role for parasites? Science 218: 384-387
- Thornhill, R, Gangestad, S (1993). Human facial beauty: Averageness, symmetry and parasite resistance. Human Nature 4: 237-269
Trivers, R. (1972). Parental investment and sexual selection. In B. Campbell (Ed.) Sexual selection and the descent of man, 1871-1971. (pp 136-179). Chicago. IL
Wind Turbine Power Energy Source Brochure
Description
You are the head of research and development for an energy company. You are branching out to the community to sell your ideas for what you think is the best energy source for my company to use.
I, Mr. Gellar, am the head of a large, energy guzzling company who needs a vast supply of cheap energy. I am looking at proposals from various energy companies to choose which type of energy will be right for my company. (Nuclear, Hydroelectric, Solar, Geothermal, Wind, Biomass, Coal, Petroleum, Natural Gas, Hydrogen Fuel Cells)
Your jobYou will choose one type of energy resource, research it and create a brochure to sell me on selecting your type of energy. Your research will be completed below. You need at least 3 references. From your research, you will create a brochure using Google slides or another program that allows you to create a digital brochure. You may draw, paint, use computer generated illustrations, or reference images you find online. A folded or tri-fold brochure is one of the requirements. Use your imagination but use research to back up your claims!
Research form and Rubric for the Energy Brochure (Links to an external site.)
Brochure for your use –Tri-Fold Brochure (Links to an external site.)
To help you choose which resource to do you brochure on: What Are Our Energy Choices? (Links to an external site.)
Helpful Links:
Nuclear (Links to an external site.) Hydroelectric (Links to an external site.) Solar (Links to an external site.) Geothermal (Links to an external site.) Wind (Links to an external site.)
Biomass (Links to an external site.) Coal (Links to an external site.) Petroleum (Links to an external site.) Natural Gas (Links to an external site.) Hydrogen Fuel Cells (Links to an external site.)
| Some Rubric | ||
|---|---|---|
| Criteria | Ratings | Pts |
| DESIGN & PLANNING |
10 pts Full Marks 7 pts Good Marks 5 pts Major Errors 0 pts Missing |
/ 10 pts |
|
Generation of Energy |
25 pts Full Marks 20 pts Good Marks 15 pts Incomplete 10 pts Major Errors 0 pts Missing |
/ 25 pts |
|
Benefits |
25 pts Full Marks 20 pts Good Marks 15 pts Incomplete 10 pts Major Errors 0 pts Missing |
/ 25 pts |
|
Drawbacks |
20 pts Full Marks 15 pts Good Marks 10 pts Incomplete 5 pts Major Errors 0 pts Missing |
/ 20 pts |
|
Images |
10 pts Full Marks 7 pts Good Marks 5 pts Incomplete 0 pts Missing |
/ 10 pts |
|
References |
10 pts Full Marks 5 pts Incomplete 0 pts Missing |
/ 10 pts |
| Total Points: 0 | ||
GEOG 1 San Jose State University The Lithosphere Discussion
Description
Topic: The Lithosphere
In discussing the lithosphere, I thought we could look closely at a place whose characteristics illustrate nearly all of the elements of plate tectonics. This way, you will get a better idea of how many features of the solid Earth and ocean work together as a system. That is expressed quite well in the Deep Dive video below. If you watch that video closely, you will understand more than you would from reading all of Chapter 10 in the textbook, which I also recommend you take a good look at.
First, let me tell you a little about the place at the center of the Deep Dive video. I recently took a trip there, a place called Changbaishan, or Changbai Mountain, also known in Korea as Mount Paektu. Changbaishan is located on the border between China and North Korea. This massive volcano last erupted, with tremendous force, about a thousand years ago. The scars remain, and within them have arisen some of the most unique ecosystems in northeast Asia.
The border between China and North Korea border runs right through the mountains crater lake, which is the site of the Korean peoples origin myth. Kim Jong Un has visited the lake several times, as have several Chinese leaders. If you look at a map (or watch the beginning of the first video below) youll notice that the China/DPRK border was intentionally diverted to allow Korean access to and dominion over at least part of this lake. Unfortunately, the North Korean people do not seem to have been given such access. But despite the fact that getting there is still difficult, many South Koreans who travel to China continue to visit from Chinese access points.
Watch: 1442 Steps to Heaven Lake [Gary Pereira]
Recommended: Valley Float Stone Forest of Changbai Mountain [Gary Pereira]
Recommended: Jinjiang River Canyon [Gary Pereira]
I wanted you to get a good understanding of lithospheric processes and how they connect with hydrological, geochemical and biological processes through the following excellent explanation. Opening this video in a separate browser gives you access to all reference URLs and papers. Try to watch it carefully, and put everything you can into addressing question 1.
Watch: Why China’s Largest Volcano Is So Unusual [Deep Dive]
Access via CANVAS (Files): StayingSafeWhereTheEarthShakes_BayArea.pdf
PuttingDownRootsInEarthquakeCountry_BayArea.pdf
Homework 11:
- Describe in detail the process of plate tectonics between the Pacific and East Asia. Why is Changbai Mountain (Mount Paektu) so unusual, in a geological sense? What is the role of water in plate tectonics?
- Retrieve from Files and read the two documents, StayingSafeWhereTheEarthShakes_BayArea and PuttingDownRootsInEarthquakeCountry_BayArea. In an essay, describe steps that should be taken before, during, and after a major destructive earthquake, from the perspective of you as a family member and/or neighbor, public servant, health care worker, business officer, planner, etc. in order to reduce suffering and loss. Assume that people around you may be in need of aid. Assume that gas lines, electricity, and communications have been disrupted. You may be at work, or school, at home or on the streets when it hits. You may fictionalize your account, with specifics, or you may write in a more straightforward manner.
Chapter 10 Essay Questions 17, 28, 33
10.17. Outline the various processes of physical, chemical, or biological weathering.
10.28. How does beach drift and longshore drift move sediment along coastlines?
10.33. Describe some the important characteristics of soil
We Accept